How did I make my fabulous ribbon board you ask? Hmm well I didn't take pictures while making it so I'll do my best to explain.
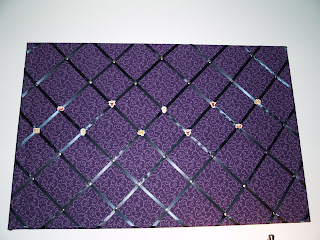
I went to Staples and bought a large bulletin board (one for push pins). I then went to either Joann's or Ben Franklin and picked out a pretty patterned piece of material. I hadn't measured so I have lots of left over material which I have a project in store for it. :) I also bought some 1/4" ribbon to use. I think I used roughly 4-5 rolls. I didn't buy enough the first time so I had to go back and get more. So measure twice buy once?!!!
I borrowed a staple gun from some lovely friends. I then laid down my board and took the material and measured it to be about 2-2 1/2" wide all around. Cut it out and then laid it down and then centered the bulletin board in the middle. I started with one side and folded the material over twice to give it a nice edge and stapled my little heart out. Now I did this on the floor and so the ground kind of cushioned the blow but it made it harder to get my staples flesh and the wood was really hard. Oh yeah get the cork board with a wood edge. Anyways after I did one side I went to the opposite side and pulled the material tight and repeated the folding over and stapling. Repeat this for the last 2 sides. :)
From there I decided how I wanted to do my ribbon. Meaning how big did I want the sections. I started in one corner and then measured to a certain distance which was 5 1/2". I would staple my ribbon and then measure for the next one. Again pull your ribbon really tight when you are doing this. A few of mine are a little loose but I'm going to add the pushpins to tighten it up. :) So do the ribbon all one direction and then go the opposite direction. Now Jared suggested I should have weaved my ribbons which is a thought to help with the points being tighter.
Once you are done stapling trim up extra long ribbon excess and hammer on any staples sticking out. And whalaa you are basically done. You can add push pins to the centers and or glue on buttons or anything you like. Now you have a beautiful decorative board to put up ideas, pictures, tickets, bills etc. :)
I dug through my tin of push pins this morning. I have hundred's possibly a thousand + of them. They are from my room as a teenager and all of my walls being plastered with pictures of boy bands and got milk ads. Anyways I found my cute angel pushpins my mom gave me and found a way to weave them in and then the rest I used silver push pins. And while I was doing this I was thinking you could still do the push pins but glue anything to the top of them that you wanted. Buttons, flowers, fluffy balls etc.
I hope this semi-tutorial was helpful. Below are a few links that will be more helpful that I used.
Helpful Links...
http://www.marthastewart.com/article/ribbon-bulletin-board
http://www.marthastewart.com/article/ribbon-board?lnc=ea166c3b5acee010VgnVCM1000003d370a0aRCRD&rsc=navigation_crafts_organizing-crafts
http://www.mormonchic.com/crafty/bulletinboard.asp
I went to Staples and bought a large bulletin board (one for push pins). I then went to either Joann's or Ben Franklin and picked out a pretty patterned piece of material. I hadn't measured so I have lots of left over material which I have a project in store for it. :) I also bought some 1/4" ribbon to use. I think I used roughly 4-5 rolls. I didn't buy enough the first time so I had to go back and get more. So measure twice buy once?!!!
I borrowed a staple gun from some lovely friends. I then laid down my board and took the material and measured it to be about 2-2 1/2" wide all around. Cut it out and then laid it down and then centered the bulletin board in the middle. I started with one side and folded the material over twice to give it a nice edge and stapled my little heart out. Now I did this on the floor and so the ground kind of cushioned the blow but it made it harder to get my staples flesh and the wood was really hard. Oh yeah get the cork board with a wood edge. Anyways after I did one side I went to the opposite side and pulled the material tight and repeated the folding over and stapling. Repeat this for the last 2 sides. :)
From there I decided how I wanted to do my ribbon. Meaning how big did I want the sections. I started in one corner and then measured to a certain distance which was 5 1/2". I would staple my ribbon and then measure for the next one. Again pull your ribbon really tight when you are doing this. A few of mine are a little loose but I'm going to add the pushpins to tighten it up. :) So do the ribbon all one direction and then go the opposite direction. Now Jared suggested I should have weaved my ribbons which is a thought to help with the points being tighter.
Once you are done stapling trim up extra long ribbon excess and hammer on any staples sticking out. And whalaa you are basically done. You can add push pins to the centers and or glue on buttons or anything you like. Now you have a beautiful decorative board to put up ideas, pictures, tickets, bills etc. :)
I dug through my tin of push pins this morning. I have hundred's possibly a thousand + of them. They are from my room as a teenager and all of my walls being plastered with pictures of boy bands and got milk ads. Anyways I found my cute angel pushpins my mom gave me and found a way to weave them in and then the rest I used silver push pins. And while I was doing this I was thinking you could still do the push pins but glue anything to the top of them that you wanted. Buttons, flowers, fluffy balls etc.
I hope this semi-tutorial was helpful. Below are a few links that will be more helpful that I used.


Helpful Links...
http://www.marthastewart.com/article/ribbon-bulletin-board
http://www.marthastewart.com/article/ribbon-board?lnc=ea166c3b5acee010VgnVCM1000003d370a0aRCRD&rsc=navigation_crafts_organizing-crafts
http://www.mormonchic.com/crafty/bulletinboard.asp
Thanks Emily! You're so crafty (:
ReplyDeleteGood job Emily! Now I want to make one for me...
ReplyDelete